Reveal: Kitchen Wall After Removing Upper Cabinets
I am excited to show you how the area around where we removed a section of upper cabinets in the kitchen looks now. The finishing touches on the wall, counter and remaining cabinets are complete.

If you haven’t seen the post where I showed how we removed this section of upper cabinets. It has made a HUGE difference in the kitchen. You can read more about the demolition process and removal of the popcorn ceiling in this post: Giving My Kitchen a Spacious New Look

Removing the cabinets is one of those home improvement projects I wished we did when we first moved into the house.

This is the image I left you with a few weeks ago right after the cabinets were removed. I had a few raw areas that needed to get a decorative finishing touch.

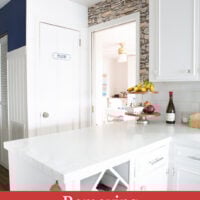
Here is the space after I added faux stacked stone wallpaper to the wall area around the doorway, painted the new side of the cabinet.
I also fixed and painted the end of the counter to look like Carrara Marble. This is where a support went into the counter that helped to hold up the cabinets.

I am so happy with how the space turned out. What I didn’t think about was how much I love the long view looking into the kitchen from the foyer looks now.

The accent of the stone wallpaper draws you in. I had a part of a roll leftover after adding it to the dining area of the kitchen a few years ago.

Now the stacked stone is on the right and left ends of the long wall in the kitchen that extends from the hallway to the lakeside deck.

Opposite the new open space is the small pantry closet. There are a lot of white doors in this area. To give them character, I made a wood plaque to resemble French enameled signs to put on each.

With no cabinets to block the light anymore, you can see into the room that was once used as my office. I recently made it over into a Multi-Purpose Room.

If I would rather not see the room, I can close the pocket door. :-)
Stacked Stone Peel & Stick Wallpaper

I found this wallpaper at Walmart a few years ago when I wasn’t even looking to wallpaper any space in my home.

I bought it knowing it would be great on the dining area wall and added it there. Adding it around the doorway was a logical choice to make the long wall look like a stone one the entire length where is no windows or cabinets.

If you have ever hung or are thinking of hanging peel and stick wallpaper, don’t hang it unless you use Roman EZ Hang.
This inexpensive product allows you to place the paper on the wall and easily slide it into place. Without it, you have to remove the whole sheet and reposition it – not easy!
Adding More Interest to the Long Wall

Back in the fall, I added grasscloth wallpaper to the backs of the open shelves that are on the long wall in the kitchen. I like the way the paper added contrast and interest to the shelves.

I have decorated these shelves with seasonal decorative accessories. Now with the textured brown paper I like them best with just my collection of white pitchers, plates, dishes and bowls.
The color works well with the stacked stone wallpaper on both sides of the long wall now.
That’s a wrap on this project. Next we will be heading into the living room to remove the popcorn ceiling in the room.
The contractor who repaired and removed the popcorn on the other ceilings has become a no show. We paid them by the room, so we aren’t out any money. We will now take the project on ourselves to get it checked off our “to-do list”.
Products I Used:
- Stacked Stone Peel & Stick Wallpaper
- Roman EZ Hang for Wallpaper – Pre paste activator that makes hanging peel and stick wallpaper much easier.
- Sherwin Williams – Pro Classic semi-gloss in the color- Pure White (7005)

This looks soooo much better!!! Shockingly so. Awesome! I love it!
It looks amazing and that was the perfect use for the leftover wallpaper.
Your kitchen looks terrific Diane! Also…love the view from your foyer. It’s very clean and welcoming. Thanks for the tip when hanging peel and stick wallpaper. We have a project coming up, and that tip will be helpful. Enjoy your day! ;)
The kitchen looks incredible from all angles!! You must be thrilled with the outcome. Using the wallpaper on the other side really ties it all together, I don’t think I would have thought of something so clever. Beautiful!
Thanks Holly. :-). We are thrilled with the spacious look in the kitchen now. It makes me like the room now.
Looks great! As you point out, the removal improves the view from many aspects. I’ve had cupboards like that in a couple of houses in the past, I didn’t like them but didn’t know what to do. Next time I will have the courage to get rid of them! I’m also glad to get the recommendations regarding the peel and stick. As always, thanks for the inspiration!
Hi Linda – I understand not having the courage to remove cabinets. It took me 9 years to get the courage to finally remove them. :-).
Looks great! Thanks for the tip on hanging peel and stick. I had given up on it.
Hi – Peel & Stick is sold as being less expensive and easy to hang. I agree on the less expensive, but it is a nightmare to hang and I can understand why you have given up. Using the spray before hanging makes it very doable.
Nicely done Diane!!
Thank you Deb. :-)
These are beautiful and inspirational. Thanks so much for these ideas.
Thanks Kara :-)
Looks wonderful !!!!
Thank you Noel. :-)
What a huge improvement that makes.
Does this change make the “hallway of darkness” lighter as well?
Hi Patti – After removing the cabinets, the hallway of darkness does get light in the afternoon which is nice to see. Other times of the day though it is still on the darker side.
Wow, I just love it!! Your projects are always so fun & I get so many useful tips. I’m wondering if your cabinets are the same white color as the doors/walls? I’d like to paint my kitchen cabinets white & my walls are SW Alabaster. Didn’t know if I should keep it all the same shade of white. Thanks Diane!!
Hi Jeanne – The cabinets, trim and walls are all the same color – SW Pure White, but you don’t have to do that. You can paint the trim one color and the walls another. If you do use the same color, use flat or eggshell on the walls and semi-gloss on the trim and cabinets. The sheen difference can be seen and that adds some contrast.
Huge improvement – well done!
Thanks Barbara :-)
What huge difference that has made!! Looks like the cabinets were never there 👍. I’m sure you’re loving the openness 💜
Hi Lynn – I agree with you that it now looks like the row of cabinets was never there. Should have done it years ago. I am really loving the openness!!!
Brava!
Beautiful job!
Thank-you Karen :-)
Absolutely fabulous! The light in the room makes such a difference. I am inspired and this is a project that is doable for most people. One of your best!
Thank you so much Elle – I wanted to remove the cabinets since we moved into the house, but thought it would be hard and it would leave a big holes in the ceiling. It didn’t. Removable was so much easier than either my husband or I thought. It is a totally doable project.
This looks great Dianne! I love how your open shelves of white dishes and pitchers look. Did you consider putting the same stone look wallpaper as the backdrop in those cupboards?
Hi Lisa – I did consider adding the stone wallpaper to the backs of the open shelves. I had recently added the grasscloth and do like the way it looks so I decided to keep it as another texture/pattern for the room. If it ever gets faded or stained, I will most likely add the wallpaper then.
Diane I have always enjoyed your creative talents but this kitchen update is gorgeous. I too love the view from the foyer. It all turned out just perfect. Keep all this creativeness coming our way😊
Hi June – Thanks. The one thing about decorating and making changes that we often don’t consider is how the changes will look from adjacent rooms. In this case it turned out to be a very good view.
It looks awesome, Diane! Great job.
Thank you Melanie :-)