The Simple Decorative Labels I Use to Organize My Entire Home
If you’ve ever organized baskets, bins, or storage boxes and wished you had labels that were both practical and pretty, this guide brings all of my decorative label ideas together in one place.
Over the years, I’ve created and shared several versions of these printable labels using nothing more than regular printer paper and fonts on my computer. I wanted my storage to work well, but I also wanted it to blend beautifully with the way I decorate my home.
What began as a practical solution gradually became one of the organizing details I rely on most. The labels I make aren’t complicated or overly styled, but they blend seamlessly with almost any decorating aesthetic and can be refreshed whenever storage needs shift.
Over time, I’ve shared several versions of these printable labels here on the blog—different shapes, styles, and uses throughout my pantry, closets, drawers, baskets, and storage boxes. I’ve brought them all together in this guide so you can explore every option and choose what fits your space best.
The Simple Labels I Use Throughout My Home
Before diving into the how-to details, here are the label styles I use most often, grouped by where they work best.
These are the designs I return to again and again because they’re simple to create, flexible enough to adjust as storage needs change, and subtle enough to blend with any decorating style.
If one stands out to you, each section includes a link to the full tutorial where I share the exact method behind it.
Decorative Labels for Open Shelving and Visible Storage
From open shelving to tucked-away closets, these labels are designed to organize quietly without competing with your home’s decor.
I tend to start with baskets and bins, especially on open shelves, because the label becomes part of what you see every day—not just a functional tag, but a small decorative detail.
Classic Label Shapes That Work Almost Anywhere in the Home
Creating labels in simple shapes offer versatility. From rectangular, oval, or softly shaped labels that transition easily from room to room. When you just need something simple these “safe bet” style can use again and again without committing to a specific look.

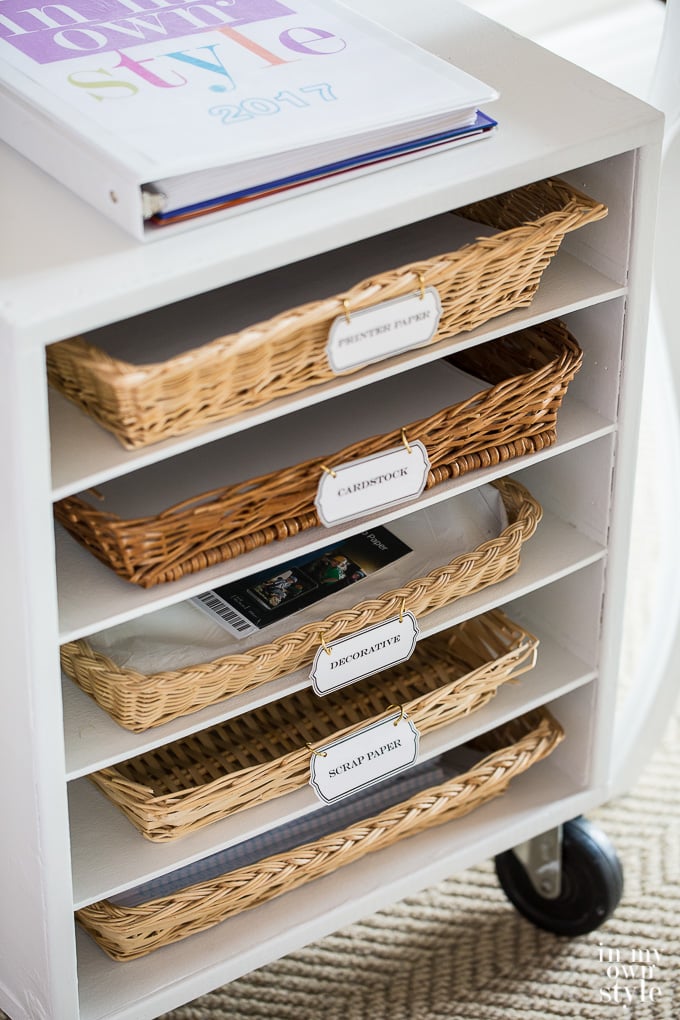
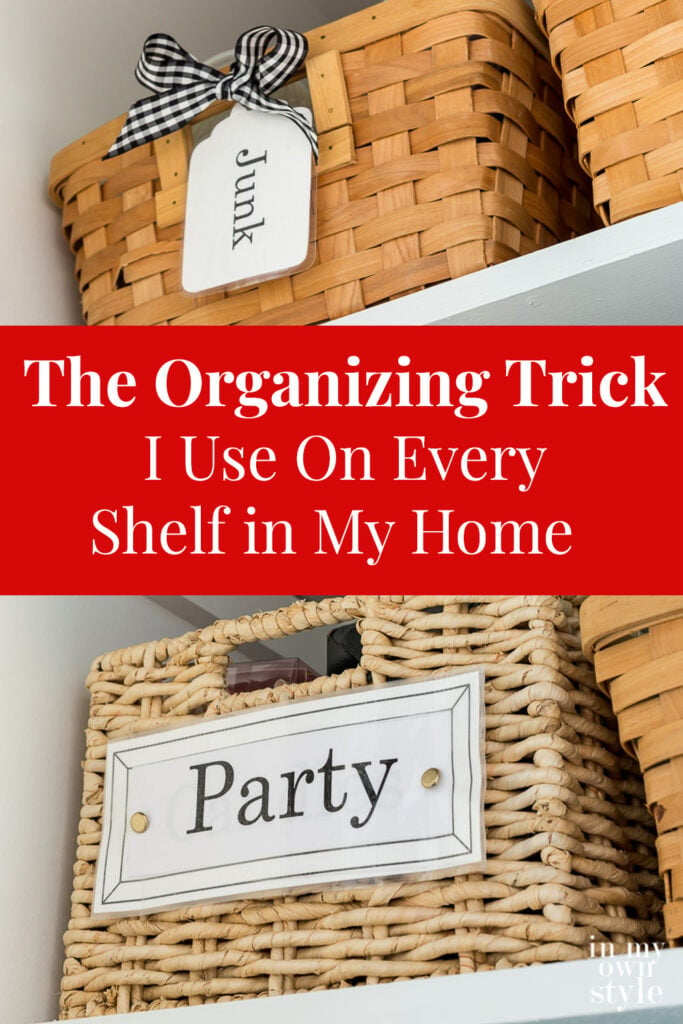
These tie-on tag style labels add a touch or pretty to dollar store plastic baskets.

For the pantry in my previous home, I made large easy to see labels so everyone in my family would know where to find things as well as where to put them back when they were finished.
Labels for Baskets, Boxes and Containers Used Inside Closets and Cabinets
Even when storage is tucked behind doors, I still label it because knowing exactly what’s inside makes finding what you need very easy. Then in reverse, when it comes time to put the item back, you will know exactly where it goes.

I added these “fancier labels” to the baskets I store all my music and movies in.
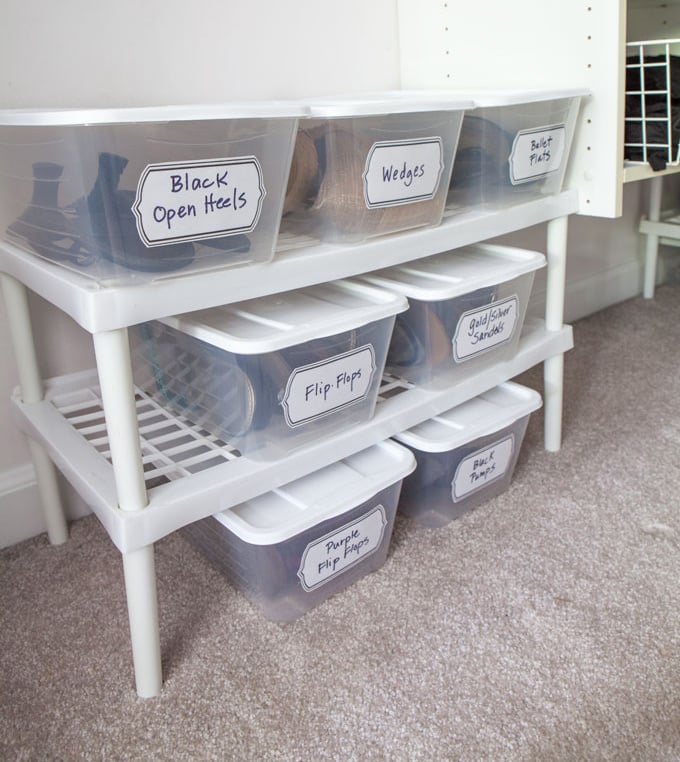
Small Storage Box Labels
Once I find a label shape that works well, I tend to repeat it in multiple places because consistency is what makes storage feel organized and interesting to the eye.
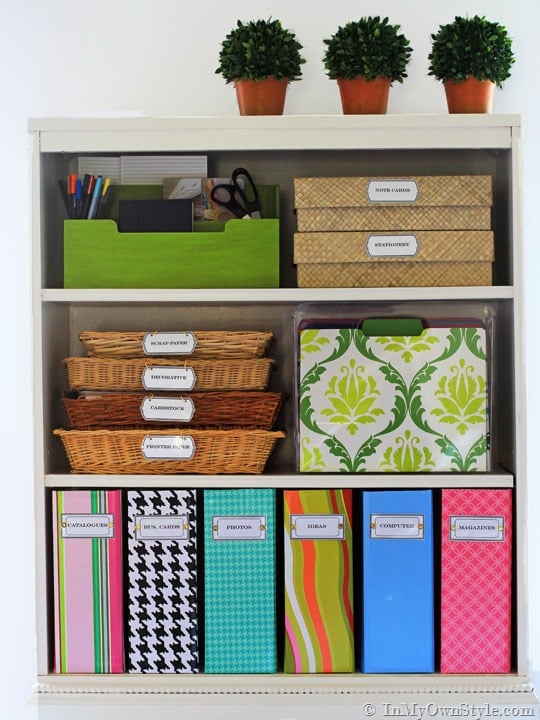
I made these smaller labels to help organize my office files and supplies in one handy place.
Decorative Label Styles That Add Style & Character to Storage
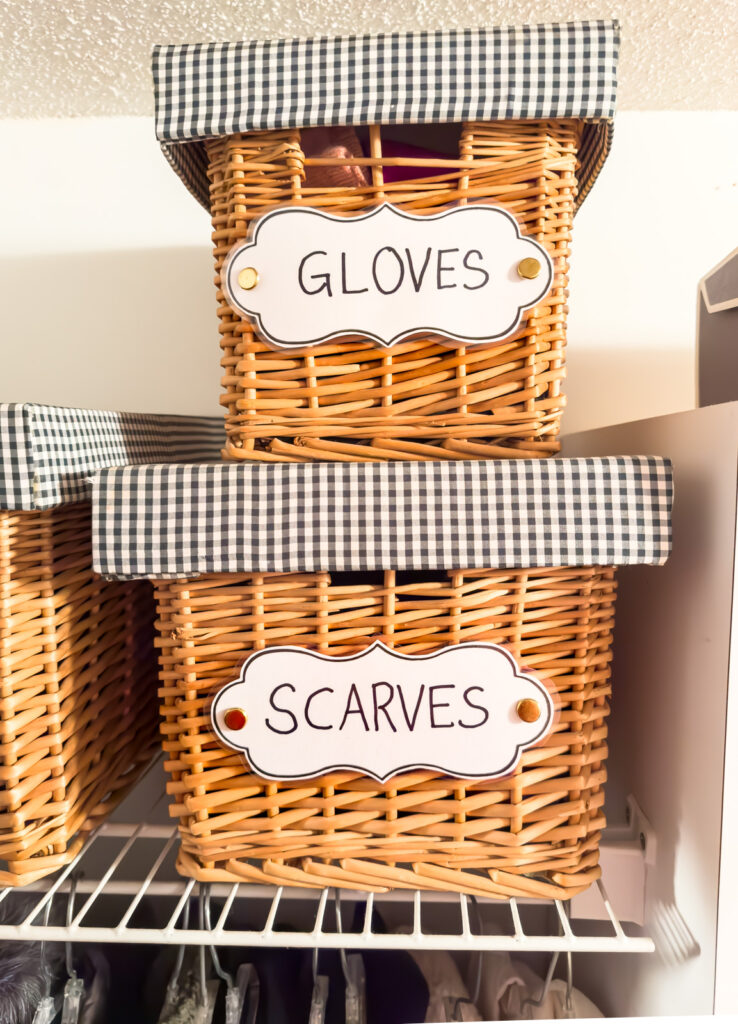
Here are the decorative labels I made to use in my clothes closet.

These are the largest labels I have made.

I added the item names to each label using the font Ever After.
If you don’t use your computer and digital fonts, you can use markers instead using your own handwriting or printing. I have many blank labels with which I do just this.
Clean and Minimal Labels for Pantry Shelves
In spaces like the pantry or laundry area, I prefer labels that fade into the background so the contents, not the containers, become the focus.

Instead of attaching the labels to the storage containers, I attached the labels under label holders that fit right over the front of the pantry shelves.

I used the same label holders for the drawers in the tall cabinets in my multi-purpose room.
Labels For Baskets and Bins That Need to Look Good on Open Shelves

I recently made this set of baby nursery labels in blue for my new grandson’s nursery.
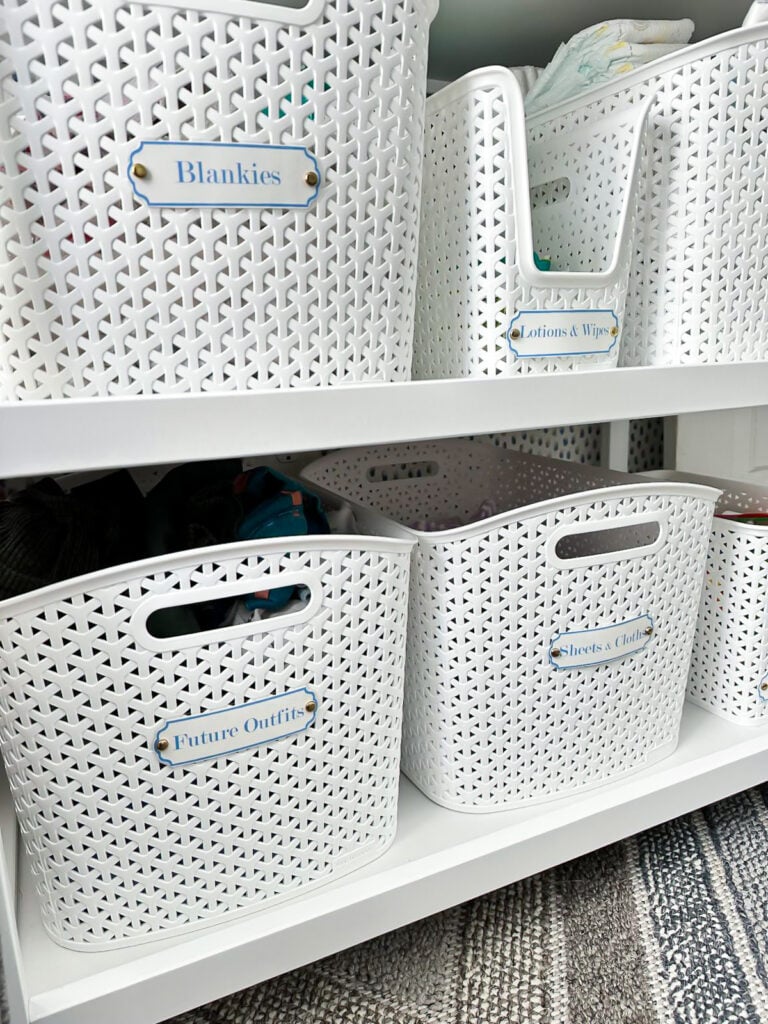
Attached with brass fasteners allows his mom and dad to keep all his things in easy reach and organized.
Simple Rectangular Labels That Work Almost Anywhere
Mix and match different label styles in one area adds even more interest to your home’s organization.

I used both tie-on tag style labels along with rectangular labels I attached with brass fasteners.
Pre-Printed Ready-Made Labels

When we had a cat and a dog, I made these large Pet Food Storage Labels and attached them to large popcorn tins I covered in Kraft paper.
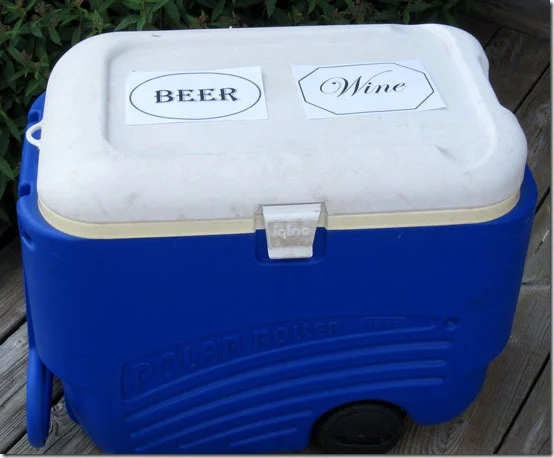
And when it is time for a party, these Party Cooler Labels sure make it easy for guests to know what is in each cooler.

If coolers aren’t your style, here is another way to have cold drinks ready for a party.
Stick-On Labels
Consistent labeling quietly pulls a space together, even when everything isn’t perfectly styled.

In a basement, for these clear bins I used clear printable sticky paper to print the labels on instead of computer paper.
Super Easy Plain Labels
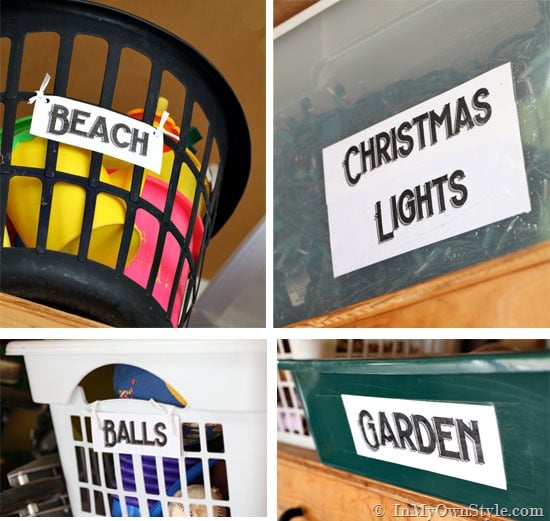
I made these very simple, but effective labels after cleaning out my garage.
The Simple Method I Use to Make My Home Organizing Labels
No matter which label style you’re drawn to, they’re all made using the same simple process. Once you understand the basics, you can adjust the size, color, font, and shape to suit whatever you’re organizing at the moment.
Below you will learn how to print the labels, cut, and attach these labels to create a personalized and efficient system for storage boxes, baskets, drawers, and bins.
For all the label templates I have posted about, I have created a gallery just for “free printable labels” for easy access so you can print any of them out.
- You can find it here: Free Printable Label Gallery
What You Will Need to Make the Labels
- Computer printer
- White printer paper in Cardstock Weight – you can buy this on Amazon, Walmart or at office supply stores
- Self Laminating Sheets – Found on Amazon, office supply stores and Walmart
- Black or colored markers
- 1/8″ paper hole punch
- Scissors and/or a Craft Size Paper Cutter
- Optional – Brass or Silver Fasteners
- For Stick-On Labels – I use these Clear Sticker Sheets
How to Change the Size of a Label
All the labels shown are sized to print out on 8-1/2″ x 11″ size computer paper using a standard home printer. If you would like to print a label smaller or larger, use your printer’s print percentage interface to print to a specific size. Choose a number larger than 100%. For smaller labels, choose a setting number under 100%.
How to Add Words To Blank Labels
Using Microsoft Word or Pages on a Mac – You can choose any pretty font that is on your computer. Type the words for the label into a list with spaces between each into a Word document in the font size needed to fit on your chosen label. Print this out. Tape it to a window and center and hold your label over the word and trace the word onto your label using a pencil. If you like it, go over with a marker in the color you want.
Using Photoshop or Photo-Editing Apps – If you know your way around Photoshop Elements or any photo editing software program or apps open up the label .pdf file in the program/app and use your favorite fonts to personalize each label, then print out the labels.
Using Canva – Upload your .pdf of the labels and then use the text tool to write the names on each label in the font and color you like. Save it and then print out on white cardstock.
Simply Write the Words on the Labels – If you don’t have access to photo editing apps or a word processing program, you can simply use a black or color marker to write the word you want on each label.
If You Don’t Like Your Handwriting – Instead of using your computer to print out pretty fonts for your labels, don’t miss my post, How to Make Your Handwriting Look Prettier.
Blank & Ready-Made Labels
Once you save the .pdf file to your computer. Simply print ready-made labels. For blank labels, print and then write what you want on each label.
How to Cut the Labels

Once the labels are printed on cardstock, I then cut them out with a small paper cutter that I bought at the craft store.
How to Laminate the Labels
To make the labels, I add a layer of shiny protection using clear single sided Self-Seal Laminating Sheets (no laminating machine necessary) over the labels so they are easy to wipe clean and will last for a long time.

If you have a heat/cold laminating machine, then you can use the Heat Lamination Sheets. You can buy these on Amazon, Walmart and office supply stores.
You can add the lamination before or after cutting out the labels depending on the look you want.
Here are the two ways to use self-seal laminating sheets when making labels:

1. Cut out the labels. Lay the label face down on the shiny non-sticky side of the laminating sheet, place the sticky side over the back of the label. When cutting you will need to leave about 1/8″ – 1/4″ of lamination all around the label so the lamination can seal. This is the way I make most of my labels.
OR
2. Lay a cut out label or a sheet of labels face down on the sticky side of the laminating sheet and then cut out the label right along the shape of the label. This leaves the back with no lamination, but you don’t see it. There will be no lamination border around the labels this way, but the fronts will be shiny and protected.
How to Attach Your Labels
Once the labels are made and laminated there are a few ways that you can attach them depending on the container.
- Use brass fasteners for baskets and cardboard boxes.
- Use wide packaging tape or clear sticky sheets for glass containers and plastic bins.
- Tie on with ribbon, yarn or string
Using Brass Fasteners


To Attach Labels on Boxes:
1. Find the center on the side of the box and mark with a light pencil mark. Center label over this mark and mark where holes are on the label. Use the awl to create two small holes in the box.
2. Push the ends of a brass fastener through label and hole in box.Use an awl to make two holes on the center of the front of the box. These holes should be the same distance as the holes punched into the label. Use brass fasteners to attach the label to the box.
3. Spread tips of brass fastener open on inside of box to secure. You can use clear tape over the spread-out tips to keep them secure.
To Attach Labels on Baskets:
Find the center of the side of the basket you want the label, then place a closed brass fastener into the hole in the label. Next push the closed points of the brass fastener into the weave in the basket, pushing the tips into the surface so the tips go inside the basket. Once the tips are inside the basket, open them up to secure the label. Repeat on the other side of the label.
Super Simple Labels
To make these simple labels, just type in the words in a word processor like Microsoft Word or Apple Pages using a font you like. Enlarge the font. Make sure to leave white space around each word. Cut each word out and then cover with the lamination paper.
I tied the labels onto the baskets using curling ribbon. On the tray containers, I used packing tape to attach the labels.
Free Printable Label Gallery
Here is where you find all the labels I have shared here on In My Own Style all in one place.

You can find all the printable labels here: Free Printable Label Gallery
On a Final Note
I’ve found that labels are one of those small details that quietly make a home feel and look more organized. They don’t have to be perfect or permanent—just clear, useful, and in harmony with the way you live.
If one of the styles you saw here feels like a good fit, you can follow the link through to the post to see exactly how I made in more detail and adapt it as needed for your own spaces.
Once you start making your own labels, it becomes surprisingly easy to tweak and adjust them to your needs.
One of the things I love most about making my own labels is that they evolve right along with my home. As storage needs change, seasons shift, or rooms get refreshed, the labels can change too, without needing to buy anything new.
Each one starts with the same simple idea and ends with a slightly different look, so you can mix, match, or stick with what feels most “you.” Organizing doesn’t have to be rigid or perfect, sometimes it’s just about finding small details that make everyday spaces feel calmer and more pulled together.
Be warned, once you start adding pretty labels to a few items around your home you may not be able to stop labeling everything in your home.
Thank you very much for sharing your labels. Your generosity has brightened my Mom’s room in her long term care facility!
Hi Penny – Thank you so much for taking the time to tell me how you are going to use the labels. It makes me happy to know that they are helping you get your moms’s room organized and cheery.
Thanks for t’he advice. I és looking hi to punt Labels to Wire baskets. You are a genius
Hi, is this available in word format so I can type in label?
Hi Kendra – Right now I do not have it in a Word format, but let me look how I need to create it and I will get back to you. Thank you for the idea.
Thanks so much for your labels. They’re simple to use, print, and very useful in trying to organize! Really appreciate your simplicity in otherwise an arduous task.
How do I use this in photoshop? Is there a way to contact you aside from comments?
Hi Terra –
To answer your question. You save the pdf printable and then upload into the Photoshop Editor on your computer. You can then remove any wording you don’t want if there is any using the brush tool and choose the color whit #ffffff. To add your own words to the labels, choose the Type tool, choose your font, color and size and type in on the labels. Center the word and save. Then print out.
You can contact me by going to my contacts page found here: https://inmyownstyle.com/contact
Your free label post was so wonderful for me to use! Thank you so much for being so generous with your talent. I have posted on my blog about using your labels (and added a link) when I reorganized my laces and Swiss trims in my sewing room. You’re right….I may not be able to stop adding labels to things!
I LOVE your site, Diane! Thanks to you, I finally made a start! First I’m doing my house, which is really too small for all we have! But I’m making labels like crazy. I have a feeding tube and that comes with a lot of stuff which is necessary. I was keeping it all in the bathroom closet, with extras spilling into the Master closet. It dawned on me that the feeding bags and plungers are only used in the kitchen, so why not keep those in the pantry? Duh! So. I have spray painted my containers and will try reorganizing the pantry (Which doubles as a laundry room, yuuk! NEVER again) We’ll be selling his house when I get it all organized an do some upgrades,
THEN, I’ll start on the retirement home we plan to move into. It was inherited from my Mom, built in ’66 and I love it! ‘Was there when it was built & know that house, besides, the mortgage is PAID in full! There’s not a lot more sq ft, but a Hugh attached garage and the laundry room is also large. I plan to make a new entrance, then use that as a mudroom entry, Laundry room and hobby room! (That alone excites me!)
I still have an estate sale to do. WHEW!
But Thanks So much for your help!= & inspiration
Anita
My computer doesn’t seem to know what to do with a psd file. What is a psd file? Can you help?
Thank you so much for all these wonderful freebies. You really do go to the last mile to give us all the help we or me needs.
And those pink boxes remind me of your beautiful pom pom throw…… do you still have/use it? I am so enamored with it still.
Good morning Sheryll :-) I enjoy making labels and sharing them. Happy to know that they are helpful. Yes I still have the pom-pom throw. I use it all year round. In the summer it comes in handy when the AC in the house makes me chilly when watching a movie or reading. When I saw the pink boxes at IKEA I knew I had to have them. I also have the magazine files in the same color in my studioffice. Enjoy your day.
So lovely label, very simple but attractive!
These are so pretty Diane – thanks for the tutorial and printables. Getting my closet pretty and organized is on my fall to- do list!
Hi Diane. These are so nice. Thank you. I love Photoshop Elements and use it daily to create scrapbooking products and freebies. Thanks again.
finally! I’ll look/be smart, chic, And budget-wise all at the same time. thanks! ♡
Love the labels, but can’t seem to get the file to open. It keeps coming up ‘open in Houzz’. I wanted the decorative ones like you used. Any suggestions?
Love your blog!
Kate
Thanks Diane! These are great and you are a peach for sharing them! Xxoo
Thanks again, Ms. Diane; I really like the font you chose, too. Very legible and happy!
Hello,
I was curious what the name of the pretty curly font is that you used for the small closet labels?
Thank you so much!
Hi Vanessa – I am not sure what label you are asking about. Is it one shown in the post you left the comment on or another? In the post you left the comment on the font used is Ever After. It is no longer found on the Dafont site, but you can still get it for free on fftonts.